Henamarth appears to be a character created by FFG as there is no mention of him in any of the books. Presumably he is one of the elves of Mirkwood that lived in the Woodland Realm under King Thranduil. This assumption comes from that the Core Set is part of the Shadows of Mirkwood cycle and set in and around Mirkwood. It is still quite possible he is one of the Galadhrim Silvan elves as there many different peoples of Middle Earth represented therein.
Card Theme
Knowing little of Henamarth, there is really only the card art to go by. He is all dressed in various shades of green seemingly to blend in better with the grass and forest around him. He has hand raise shielding his eyes as if trying to see something in the distance. It appears he is being depicted as a scout or sentry of some kind. In either case, seeing dangers before they are generally known fits well with his ability to see the top card of the encounter deck.
Card Synergies and Interactions
Quest Control / Willpower Bonus
Henamarth is a true solo king because knowing the top encounter card gives a player the exact staging area threat they’ll be questing against most of the time. That is barring surge and other similar effects that would lead to another card being revealed or added.
This allows the true solo player to send exactly amount of necessary willpower or hold back enough characters for combat. Willpower bonus abilities that be added are still good to have. These allow the player to use their characters more efficiently and keep as many as possible open for combat.
Encounter Control
There are a number of cards that trigger based on when a certain kind of card is revealed during staging. Thalin from the Core Set is an example of the later and works really well with Henamarth. Thalin’s 1 willpower is not that helpful for questing. A player knowing when to send him, especially in true solo, to trigger his ability versus hold him back to use his 2 attack or 2 defense is much more efficient. Expecting Mischief is very similar to Thalin but being a one time event is much riskier to play blindly. Warden of Arnor being the location version of Thalin can ensure that the Scout hero is only questing when needed. Spirit Merry hero and can quest if Henamarth shows no enemy is expected in true solo. There are also a few cards like Leadership Gimli ally, Leather Boots, and Wingfoot that can ready a character depending on the card revealed. Henamarth can ensure a player knows when the ready will be triggered and send them to the quest without worry.
There are also a few cards that trigger based on looking at the top card of the encounter deck. The Longbeard Elder gets to do a little location control if the top card is a location. The Ithilien Lookout can help set that up with his response to discard the top encounter card if it is an enemy. That would also allow the player to draw a card when playing a Cautious Halfling. Otherwise the Celduin Traveler can get rid of the top location if the player(s) don’t like it.
Messenger of the King
Henamarth as a Messenger of the King (MotK) hero doesn’t bring much in stats, but the threat cost of 3 is prime to enable Secrecy. The biggest problem with Henamarth as a MotK hero is his 1 health. He is only a single undefended attack or direct damage from a treachery away from dying. There is Elven Mail to give him 2 more hit points. Still very risky and potentially lose a Lore resource per round. Gleowine for the same threat cost can quest for the same, has 2 hit points, and can draw a card. Gleowine for the cost seems to be a better pick than Henamarth.
Silvans
Henamarth doesn’t have the enter play effects of the later Silvan allies that came out in the Ringmaker cycle. He can still benefit from Celeborn’s stat boosting ability and the cost reduction offered by O Lorien!. Galadriel synergizes well with him too since he can quest when he comes into play and still be ready to use his ability. Targeting him with The Tree People is a decent option since he is cheap to replay.
Silvans also have a few attachments that can played on allies. Generally they’re better on the stronger Silvan allies like Legolas or Marksman of Lorien or a Silvan hero. They’re still an option to make Henamarth into a ranged attacker that lowers enemy defense by 2 or potentially a secondary defender for weaker enemies with 1 defense and 3 hit points from Elven Mail and Cloak of Lorien. Silvan Trackers can heal off any damage taken quite easily.
Ring Rating
Card Talk uses the highly scientific yet arbitrary scale of 1 ring for the card to rule them all to 10 to be cast back into the fiery chasm from whence it came.
I rate Henamarth at 2 rings. He is cheap to play, gives the player 1 willpower or 1 attack, and has a useful ability. Worst comes to worst, a player can always chump block with him as well. Just tremendous value for his cost.
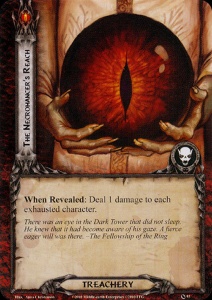
Then his ability is just so strong in true solo. Knowing exactly what the staging area will have most turns allows a player to split their heroes and allies most efficiently between questing and combat. If there is a treachery, foreknowledge of its effect can let a player play around it. For example, knowing the top encounter card is Necromancer’s Reach that will deal a damage to each exhausted character, then the player can just commit characters that have more than 1 hit point remaining. His ability can also help in defending because it can show what the first shadow card will be. That foreknowledge can make the difference between losing a defending hero and losing a cheap ally in their place.
The low cost means he can slot into just about every deck with Lore. He doesn’t synergize perfectly with the Silvan cards that came later, but he still works with them although there might be better options. There isn’t really any downside to him. If I’m not playing him in a deck with Lore then it is because it is built around a theme or trait.
An encounter scrying deck full of direct damage effects. The direct damage is meant to kill enemies as soon as possible after they’re revealed in staging.
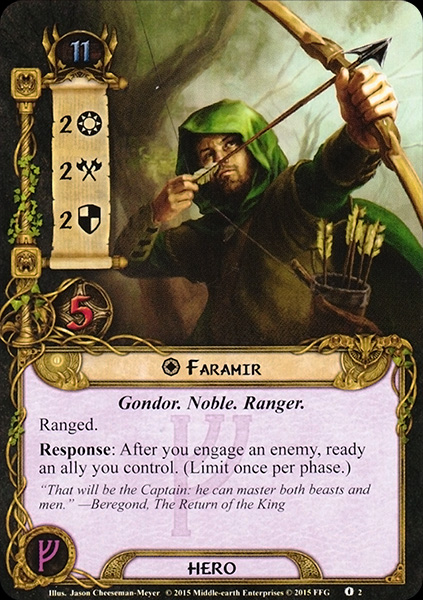
Faramir was the younger brother of Boromir. He was a brave warrior who loved lore and music and was disliked by Denethor, his father, for his gentle nature. After Boromir’s death, Faramir commanded the Rangers of Ithilien and found Frodo and Sam on a mission. Despite initially holding them captive, Faramir showed his quality and did not succumb to the lure of the Ring. He was later struck down during the War of the Ring and almost burned alive by his father. He was saved by Gandalf and healed in the Houses of Healing. There he met Eowyn, fell in love with her, and the two later wed.
Card Theme
The ally can be a representation of Faramir as the Rangers of Ithilien captain. They had to fight against superior numbers. As a result, he had to keep them moving and carefully choose their battles. It would take tremendous willpower to keep fighting in that situation and keep his men alive.
Card Synergies and Interactions
Cheap Allies
The more allies, the more targets to gain +1 willpower when he exhausts. Gondor, Outlands, Silvan, and Hobbits all have pretty low cost making it easy to play several in a few short turns. Gondor in particular has several allies in Leadership fitting in quite nicely with ally Faramir. Outlands typically has Leadership access thanks to Hirulan the Fair being in Leadership while also providing resource smoothing for Outlands allies. Silvan similarly typically uses Celeborn and/or Thranduil heroes. Hobbits have Leadership Frodo and Sam heroes to provide Leadership access.
Mustering
Cards that can put allies directly into play can help build the ally swarm and maximize his willpower boost.
Ally Readying
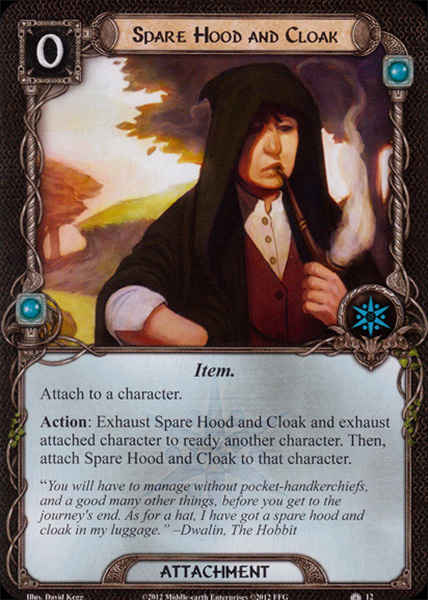
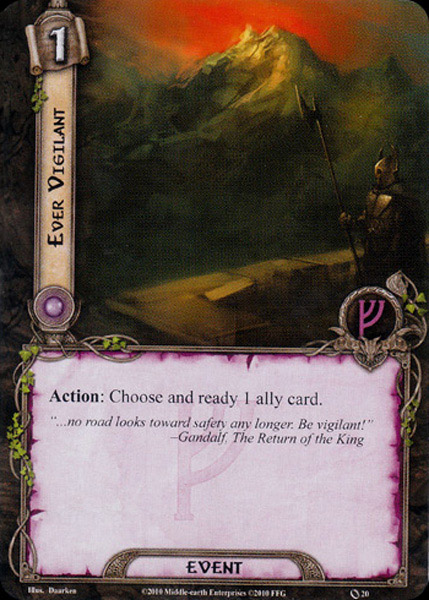
There’s no limit on Faramir’s ability other than how many times a player can exhaust him. Ally readying effects are more limited than those for heroes. The Core Set provided one in the same sphere, Ever Vigilant. Later expansions introduced some repeatable ally readying with Leadership Frodo hero, Leather Boots, Spare Hood and Cloak, and Narya. Although Spare Hood and Cloak either needs to have Faramir exhaust and move it to another character or a Long Lake Trader.
Global readying effects not only help by letting Faramir use ability twice, but allow the player to send all their allies to the quest and ready for combat.
Sword-thain and Messenger of the King
Both cards can make Faramir a hero. This opens up many more readying cards like Unexpected Courage for multiple uses of his ability. Messenger of the King has the big advantage of letting Faramir be a hero right away and get to using his ability more than once. It however limits readying him to just once per phase. Faramir then could only double boost a player’s willpower. Sword-thain doesn’t have this upper limit. It is less reliable since a player needs to draw and play both 4 cost cards.
Quest Specific
Faramir’s ability helps more in quests with stages where it is better to rush through them. The classic example is Stage 2 of Journey Along the Anduin. It has players reveal an additional card each turn and keeps enemies from engaging. It can be very easy for too many cards to build up in the staging area with the extra card and each player limited to engaging 1 enemy per turn. Wastes of Eriador has a similar Stage 2 where during Night the players have to discard an ally. Staying in that stage can be very detrimental as the effect combined with enemies eats away at the player board state. Questing through the stage minimizes the negative effects in each of these scenarios. Journey in the Dark, there is an objective that counts down until the arrival of the Balrog. Questing quickly through before the Balrog arrives makes the scenario much easier. Desert Crossing in the Haradhrim cycle has a time limit with players losing when they reach 60 temperature and the temperature rises every turn. Questing quickly is key to winning that scenario.
Another common situation in scenarios is players just need to quest through the last stage to win. The Hobbit Over Hill and Under Hill has this in We Must Away Ere Break of Day, and Dungeons Deep and Caverns Dim both have this. Dungeons Deep and Caverns has the added twist of treacheries all gaining surge. The Dread Realm also puts a little twist on this with requiring all locations to be explored and placing progress from the quest on each location in play. Similar to the situations above, it deals damage to characters if any locations are still in play and lingering for multiple turns can be punishing.
Ring Rating
Card Talk uses the highly scientific yet arbitrary scale of 1 ring for the card to rule them all to 10 to be cast back into the fiery chasm from whence it came.
I rate Faramir Leadership ally at 3 rings. His ability is undeniably powerful considering how vital questing is to the game. He is a little costly at 4, but in the sphere with the best resource acceleration cards its really not bad at all. If anything the main downside is he can be a win more card if played late in the game. Especially as the card pool grew to include more efficient questing allies. Still he provides an tremendous boost and with as an action, and it can be used after staging. Messenger of the King enabled providing this willpower boost ability. It also opens up many more readying cards making a double boost much more consistent, but it caps the usefulness of those effects given the limit once per phase limit. Even if a player doesn’t use his ability, he has a decent 2 defense and 3 hit points to help defend some weaker enemies.
Eldest son of Gondor’s Steward and a commander in their army. Driven by a dream he had to go to Rivendell where he joined the Fellowship of the Ring. He fell to the temptation of the Ring and tried to take it from Frodo causing the breaking of the Fellowship. Shortly afterwards, the Uruk-Hai attacked Merry and Pippin as they searched for Frodo and lead to Boromir’s demise as he defended them. As he lay dying, he confessed his attempt to take the Ring to Aragorn.
Card Theme
This version of Boromir gets a defense bonus when the player is engaged with a higher engagement cost enemy than their threat. He is the only non-Hobbit character to have an ability the engaged with higher engagement cost enemy. All other characters with this kind of triggered ability are Hobbit characters. This clearly is intended to be Boromir as he defended Merry and Pippin from the Uruk-hai. Adding to this association is that he readies every time that he is damaged. This could easily happen as he defends from attacks, but also from characters with Archery that deal direct damage. The archery damage can be even more fitting as he had a few black arrows in him from the Uruk-hai’s bows.
Card Synergies and Interactions
Low Threat Heroes and Threat Reduction
Boromir’s defense bonus works more consistently the lower the initial threat cost of your heroes. Thematically, Hobbit heroes comprise a large portion of the heroes with with 7 threat cost or less. Although there are many other options like Spirit Glorfindel, Mirlonde, Smeagol, and Tactics Eowyn that also have a threat cost of 7 or less. If expanded to 8 many more options become available like both versions of Denethor although 3 heroes at 8 threat get close to 25 engagement cost which is one of the more common enemy engagement costs. Messenger of the King further expands the roster to unique allies with useful abilities but not many stats like Ioreth and Gleowine. Another option to start with low threat to increase the consistency of the defense bonus is to use only 1 hero with The Grey Wanderer contract.
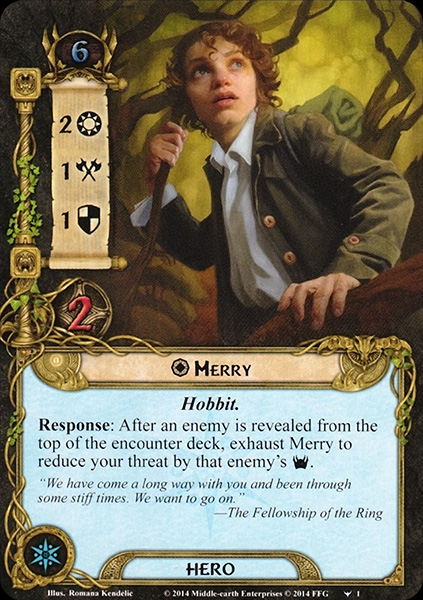
An addendum to starting with low threat, is keeping threat low. Spirit Merry covers both considering he only has 6 threat cost and his ability can reduce the player’s threat each time an enemy is revealed. In sphere with Boromir, there is really only Secret Vigil. In the Hobbit deck that his ability works best with, there are several options like Elvenses, The Shirefolk, and the other staples like The Galadhrim’s Greeting Woodmen’s Clearing.
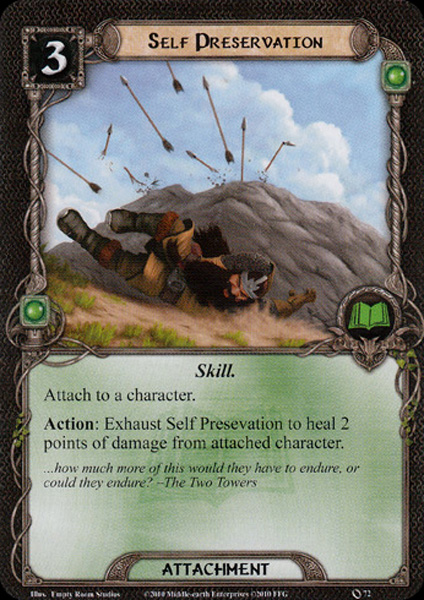
Healing
Healing allows a player to really maximize Boromir’s second ability. Each time he takes damage, he can ready. If a player heals him after taking that damage, he’s free to keep taking damage and readying. There’s no limit on the ability unlike the errata’d Tactics hero version.
Repeatable effects like Warden of Healing, Ioreth, and Self Preservation work very well since they can be used after Boromir is damaged by enemy or other effect. Additionally they can be boosted by Elrond Hero. Other one-time healing effects like Healing Herbs and Lore of Imladris are better if Boromir already has taken significant damage and even better if he has additional hit points from ally attachments.
Ally Attachments
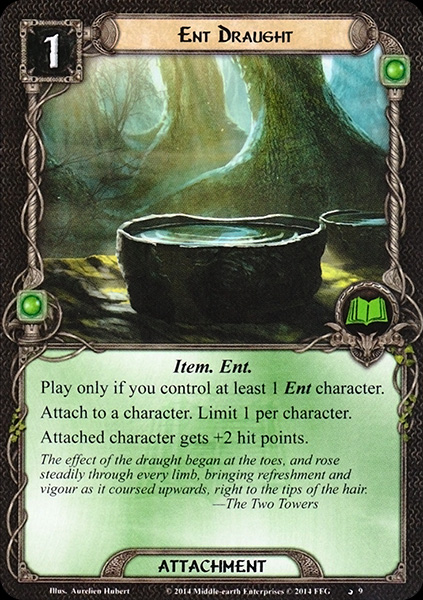
There are a few ally attachments that can really boost his defensive and readying capability. Hauberk of Mail and Round Shield can increase his defense. Ent Draught, Vigilant Guard, Wild Stallion, and Raiment of War provide more hit points to let him take more damage and keep readying. Wild Stallion and Raiment of War adding attack as well make his readying even better when he is ready to attack back. Card Talk contributor Quetzal wrote a great review of Boromir on Ringsdb years ago pointing out a great interaction with Vigilant Guard. He noted you can use Vigilant Guard’s damage redirection ability to damage Boromir and ready him even more often. Quetzal suggested using this with hero Beorn because he can defend without exhausting but has low defense. Ringsdb user AJ_800 took it a step further using hero Treebeard’s ability to deal damage to Boromir up to 5 times per phase. Note, Treebeard won’t get the bonus willpower or attack since the he doesn’t pay the price of taking the damage himself.
Sword of Morthond can indirectly increase any of Boromir’s stats. It really just depends on how many of the Outlands allies are included along with Boromir.
Hirgon and Tactics Imrahil
Boromir’s 4 cost is expensive especially in a sphere with few resource acceleration options. Hirgon offers a way to discount Boromir with the added bonus of boosting his combat stats. The built-in readying of Boromir can really leverage the boost. Tactics Imrahil also can possibly find and put Boromir into play for a turn. Normally shuffling the ally back into the deck is a full on downside. There is a bit of benefit to it for Boromir ally since all damage is removed. A player could potentially get 2 or 3 readies in Boromir and then basically fully heal him by putting him back into the deck.
Messenger of the King
Messenger of the King opens up many more attachment options and offers a slightly lower threat cost at 9 compared to 11 of the regular hero version. Top among of them in power is Gondorian Fire and Blood of Numenor. They each have a player spend a resource for bonus attack or defense equal the resources on the hero. This was a mainstay of pre-errata Tactics Boromir hero that had no limit on his readying. Specifically for this version, Citadel Plates for many more hit points along with Well Preserved and The One Ring for full healing each turn can really turn him into a defending and readying machine.
Damage Cancelation
Damage cancelation is a bit of nonbo or combo that doesn’t work. As mentioned earlier, abilities like hero Treebeard that say take damage for an effect, damage is considered the cost. If the character doesn’t take the damage, then the cost isn’t payed and the effect doesn’t happen. This doesn’t mean they can’t help if Boromir would take more than 1 damage, but players have to be careful to not cancel all the damage.
Ring Rating
Card Talk uses the highly scientific yet arbitrary scale of 1 ring for the card to rule them all to 10 to be cast back into the fiery chasm from whence it came.
I rate Boromir at 3 rings. I’ll admit prior to my review, my opinion of this card was pretty middling. When I play Hobbits, I tend to make a super defender with Hobbit Cloak and other defensive attachments or just chump block. The only deck I’ve played the card in was Seastan’s Tactics Imrahil deck called Bouncy Bear. It primarily focused on using Spare and Cloak to maximize actions with the beefy allies in the deck. I realized as I prepared for this review by looking at various decklists and reading other reviews that there were many more combos with this card than I thought. I’m especially intrigued by the possibilities with Vigilant Guard readying Boromir. The cycles since The Road Darkens came out have really opened up more decks that this version can be useful in besides just Hobbit decks.
He still faces some tough competition for attention at 4 cost in Tactics between the excellent Legolas ally and fun to build around Vigilant Dunadan. The original Tactics Boromir that is still a very good hero despite his readying limited to once per phase by the errata. Leadership Boromir also sees a fair bit of play despite being a bit niche for Gondor Swarm decks. It is a card that likely has been long overshadowed by the hero versions that came out earlier in the game.
Merry and Pippin stayed with Quickbeam while the other Ents discussed going to war against Saruman at the Entmoot. He decided early to attack Saruman as he was a hasty Ent and his trees suffered much at the axes of the Uruk-hai.
Card Theme
The game has a great mechanism to represent how the Ents are not hasty in the game. They enter play exhausted.
They all have good stats, often hero level stats representing how powerful these ancient tree herders are. Entering play exhausted keeps a player from utilizing their stats right away without another card effect to ready them. This results in a tempo hit. Tempo is a game concept I originally learned in Magic the Gathering. Basically it describes the pace a player is on to victory. If you are quickly playing cards that each get you closer to winning then your tempo is fast. Another player can disrupt this tempo by getting rid of or canceling those cards. Ents can help contribute to that pace of the game, but players have to delay getting that benefit for a turn since they’re not immediately available. The encounter deck then might be a card ahead in tempo since the player forgoes using a card to deal with the new treachery, location, or enemy revealed that turn. Then it becomes a question of, if the power of the Ents overtake the encounter deck’s tempo advantage,
Card Synergies and Interactions
Ent Tribal
There are many other Ent cards that synergize quite well with Quickbeam as many have effects that work with damaged Ents. Booming Ent and Leaflock each count how many damaged Ents are in play to gain attack and willpower boosts, respectively. A player then that damages Quickbeam to ready him right away can also be boosting other Ent allies. Boom and Trumpted is a little more difficult to realize the benefit using Quickbeam’s ability, but not impossible. It just will require effects that put an ally into play outside of the planning phase like Sneak Attack or Reinforcements. Then of course there are facilitating cards like Entmoot and Treebeard ally. Entmoot is fantastic tribal card draw since it is not look at the top 5 and choose one but get all the Ent cards. Even if it doesn’t offset Ted’s top drawback for all cards, it most likely will significantly thin a player’s deck to increase the change of drawing it later. Treebeard ally acts like a 4th hero in Ent centric decks since his resources can be used to play Ent allies. Lastly, Wellinghall Preserver’s healing offsets the cost of Quickbeam’s ability since it can heal him during the Refresh phase.
Ally Action Advantage / Readying
Quickbeam has a good willpower of 2 to quest and an strong attack of 3 for an ally. It can be difficult to decide which to utilize especially if his 2 willpower is always needed to quest then a player is forgoing the use of his best stat. There are fortunately many ways to ready him. As seen earlier, there are a couple Ent speicific options with ally Treebeard if he has 2 resources although often it is better to just ready Treebeard himself. Boom and Trumpted can be an incredible play especially since it will boost his attack to 6. It will be difficult to manage outside quests with Archery considering Quickbeam’s weakest stat is defense.
While he can’t have restricted attachments, there is Valiant Determination and Spare Hood and Cloak that can let him both quest and attack. Valiant Determination is the best of these as it will ensure he can do both every turn. Leadership Faramir hero is another way to potentially get the most use of him although it will be dependent on engaging an enemy every turn. Leadership introduced ally readying with Every Vigilant and Grim Resolve in the Core set. Ever Vigliant is a reasonably efficient to get 3 attack on an enemy. Grim Resolve with the global readying is more aimed at turning the tide of a game to make a big quest push and then try to clear the board in combat. The Free Peoples offers a bit more synergy considering Quickbeam is such a strong efficient character that can easily fit into a deck with variety of traits. Even better it will boost his willpower to 3 for that big quest push.
Fellowship
Quickbeam already has hero level stats with his 2 willpower and 3 attack. He works especially well with this contract considering he’s only 2 cost. This is very helpful considering it requires 9 unique characters in play. The faster a player can get those 6 unique allies out to pass the threshold, the sooner all those characters gets +1 willpower, attack, and defense. Quick beam then gets 3 willpower and 4 attack. This is great since he can’t have restricted attachments and can’t get many of the other stat boosting attachments for allies.
Messenger of the King
Messenger of the King Quickbeam is a terrible nonbo. Quickbeam is amazing because he has the stats of a 4 cost ally or regular hero for the low, low cost of 2 Lore resources. Messenger of the King makes you pay the full cost of his stats with 9 threat and he’s enters play either exhausted or with a damage unlike other 9 threat cost heroes. A player is better off choosing a different unique ally with a a good ability, or a low threat hero with a decent stat or two. Lore has enough card draw that Quickbeam is easy to dig out the player’s deck.
Ring Rating
Card Talk uses the highly scientific yet arbitrary scale of 1 ring for the card to rule them all to 10 to be cast back into the fiery chasm from whence it came.
I rate Quickbeam at 1 ring. His cost to stats ratio is insane. Then his ability to ready once he comes into play completely offsets the Ent drawback of entering play exhausted to compensate for the higher stats. He has to take a damage, but that’s not a big deal and can even be a synergy. That can help immediately boost a Booming Ent. Otherwise, it only takes one Wellinghall Preserver to offset that cost. Even if he isn’t healed, he still has a 2 respectable hit points. There are a few quests that have effects that scale by damaged characters, but there so few and far between that it is negligible. The only arguments I have against him being a 1 is that he’s not neutral and he’s a terrible Messenger of the King hero. Otherwise, any deck I’m building with Lore that isn’t a trait centric deck or using Forth, the Three Hunters is going to have a minimum of one copy of Quickbeam. Most likely 2 to increase the changes of seeing him and minimize having a dead draw since he’s unique.
Master of Lore created an Ent deck designed to avoid the tempo hit using Grima to play Treebeard turn 1. Faramir can ready Ents while engaging enemies or Treebeard’s resources will ready them if there are no enemies in play.
Main Deck
Hero (3) Faramir (The Land of Shadow)
Gandalf (The Road Darkens)
Gríma (The Voice of Isengard)
Peregrine “Pippin” Took most people know as the hobbit that sang a sad song while Denethor made a disgusting mess of a tomato. He also is Merry’s cousin, a relative of Bilbo and Frodo, and good friend of Frodo and Merry. So much so that he aided in Frodo’s plan to cover his leaving the Shire. He helped Frodo pack for his apparent move from Hobbiton to Buckland. Then accompanying Frodo on his journey to Rivendell.
At Rivendell he would join the Fellowship of the Ring. Notably he caused the commotion that lead to the Fellowship being attacked by Orcs and a Troll. This ultimately led to Gandalf’s demise by Durin’s Bane. He would also inadvertently lead to Boromir’s end. This time due to being ambushed by Orcs as Boromir attempted to defend him and Merry.
It is after being captured by the Uruk-hai that he shows his quality. He keeps his wits to leave a clue for the Three Hunters and engineer his escape with Merry. Then he and Merry manage to get the Ents to attack Isengard and stop Saruman.Pippin’s curiosity about the Palantir diverts Sauron’s attention to Gondor and Rohan as Sauron thinks Pippin has the Ring at Isengard. He rides with Gandalf to Gondor and upon arrival enters Denethor’s service in honor of Boromir’s sacrifice. This position allows him to know of Denethor’s plan to burn Faramir and himself to death and get help to rescue Faramir from the funeral pyre. Pippin also participates in the final battle at the Black Gate killing a troll that subsequently falls on him and removes him from the battle. After returning home to the Shire, Pippin would help oust Sharkey/Saruman by raising the Shire against Sharkey and his men.
Card Theme
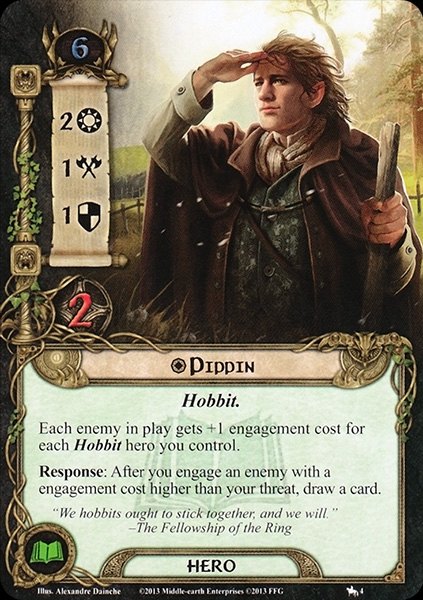
Pippin having 2 willpower is reasonable considering he volunteered to help Frodo leave the Shire. Then despite the dangers they encountered there, again volunteered for the dangerous mission to Mordor to destroy the Ring. While he wasn’t a fighter early in the story, Pippin learned how to fight as demonstrated by his taking down a Troll at the Battle of Morannon. That his attack is predicated on attacking an enemy with higher threat is aligned with other hobbit cards to represent their sneakiness and affinity for stealth or being underestimated.
Card Synergies and Interactions
Hobbit Tribal
There are 3 in sphere cards that can work very well with ally Pippin.
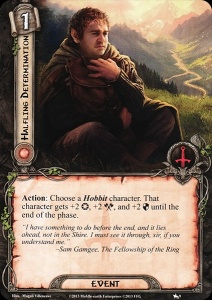
Many hobbit decks tend to be tri-sphere as they have several good cards across all 4 spheres. Tom Cotton‘s resource smoothing ability makes it easier to play Pippin and gives him 2 attack the turn he enters play. The second ability synergizes very well with Raise the Shire. Raise the Shire is great to help find Pippin. In the best case scenario, the players engages a higher engagement cost enemy, finds Pippin to put him into play, attacks for 4, and then returns him to hand to play Pippin again to quest for 2 and attack again for 4. Halfling Determination can make Pippin have top tier hero level willpower or attack for a phase.
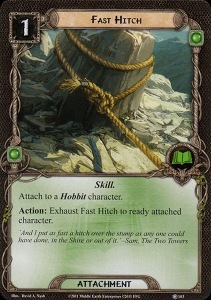
Odo Proudfoot is also useful to help find Pippin. Fast Hitch, however, is a bit of a nonbo. Pippin already readies himself when engaging an enemy with higher threat cost. Secondly, his attack is conditional and may not always have attack to make good use of the ready. Lastly, if playing a Hobbit focused deck, a player likely has a better target for this that I’ll discuss in the Messenger of the King and Sword-thain section.
Engagement Control and Threat Reduction
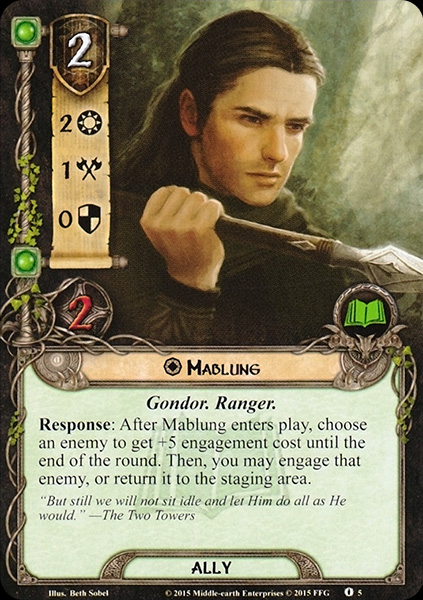
The game has 2 ways to help ensure Pippin’s abilities can trigger, increase the enemies’ engagement cost and reduce a player’s threat. There are only a couple cards that can increase an enemy’s engagement cost, Take No Notice and Mablung ally. Both only do so by 5 and for a single phase. This limits their usefulness significantly because 5 will not push the enemies with very low engagement of 10 – 20 above the threat of most decks. This cross-section of enemies are the ones this effect would be the most useful against and needed, but they don’t increase it enough. The only repeatable engagement cost increase is from Lore Pippin‘s ability and can’t be used with his ally version.
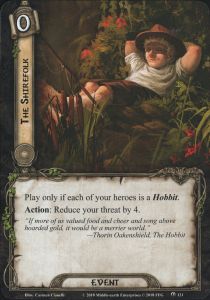
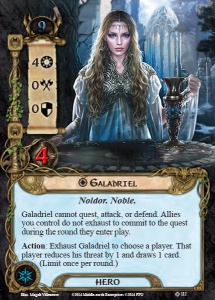
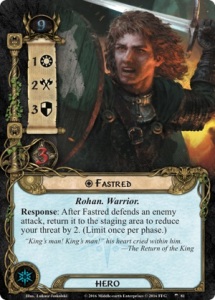
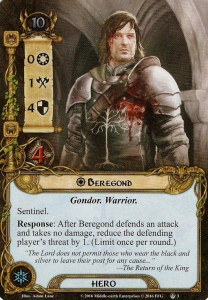
Threat reduction is better considering there are several more cards for it. Unfortunately, in sphere there is only Secret Vigil that at best will reduce each players threat by 4. Fortunately, hobbit focused decks have The Shirefolk that can reduce threat by 4 for free and it is neutral. Elevenses is another hobbit specific option can significantly reduce threat mid to late game when lots of hobbit allies are out. Galadriel, Fastred, and Spirit Beregond all provide repeatable threat reduction. Galadriel and Beregond won’t help lower threat below more enemies’ engagement costs, but they’ll maintain threat turn after turn that a lower threat deck can still ambush the same enemies from beginning to the end of the game.
Fellowship Contract
Pippin is a thematic fit with this card. He like any other unique character gains great state buffs. This means once flipped Pippin could quest for 3 and attack for 3 when engaging an enemy with higher engagement cost than the player’s threat. On top of that, many unique allies are on the more expensive side. Pippin at only 2 Tactics resources can get into play quick and help flip the contract.
Messenger of the King and Sword-thain
As a Messengar of the King Hero, Pippin is pure value. He becomes a 4 threat hero that often times will have 6 threat of states. Especially as he will help keep the total low. It also opens up giving him state boosting attachments like Celebrian’s Stone or Dagger of Westernesse to make him more effective either questing or attacking. Thorongil is also a great option to add his Lore version to him. Then engagement costs are always at least 1 higher for better chance of triggering his abilities and possibly drawing a card as well. On top of this, Rosie can help boost his stats further even in both phases when a Fast Hitch is attached to her. Sword-thain also opens this possibilities, but it comes with the downside that Ted always points out in the podcast. That is the player has to draw it first. Still, it is great that the card referring to Pippin swearing his service to Denethor can be used on him and is useful.
Ring Rating
Card Talk uses the highly scientific yet arbitrary scale of 1 ring for the card to rule them all to 10 to be cast back into the fiery chasm from whence it came.
I’m very close to 1 on ally Pippin because I know how hard it is to get willpower in Tactics. I’m rating him at 2 rings. Any Tactics ally with 2 willpower is almost an auto-include in mono-Tactics. That he is 2 cost for 2 willpower putting it on par with the best questing allies usually concentrated in Spirit is fantastic. On top of that he has great abilities with the conditional readying and attack that fits right in with other hobbit cards. He is great for almost any deck running Tactics or hobbits.
I didn’t rate him a 1 ring because outside hobbits or other low threat decks he is often just a 2 cost quester. Two cost questing allies are solid cards, but they’re not a card like A Test of Will that will save the players from certain defeat, or Core Set Gandalf that are so powerful that they can turn the tide of the entire game. I also think that Forth, the Three Hunters lowered the value of willpower allies in Tactics. Tactics has more restricted attachments than the other spheres making it easy to flip the contract and get the willpower boost. Three Hunters decks can quest really well when combined with some other willpower boosting attachments and the combat power of the restricted attachments to destroy enemies reliably.
Pippin ally is still an incredibly strong fair costed card with great abilities. He’s a pretty good target for Messenger of the King and works well with the Fellowship contract. He can synergize well with other hobbit cards as both his abilities that want to engage and attack enemies with higher engagement cost. He helps Tactics with one of their major deficiencies since the Core Set. There is a lot to like about this card and has become a staple of my decks with Tactics that aren’t using Forth, the Three Hunters.
Admit it, you cracked open the Core Set (or Revised Core Set) for the first time, saw Gleowine, laughed at the artwork, and immediately thought “surely this card can’t be very good.” However, as is the case with many things in life, one of the golden rules of The Lord of the Rings: The Card Game is to not immediately judge a book, or card, by its cover. Or even first impressions. There are multiple facets to a review of Core Set cards that launched the game over 10 years ago including considerations such as its impact in the early card pool/quests as well as how the card ages as the card pool grew and matured. Gleowine is no exception, and many of these points, among others, will be examined in this review.
Background / Lore
Not much is known about Gleowine. He is only mentioned briefly in The Return of the King after the Battle of the Pelennor Fields. He was King Theoden of Rohan’s minstrel who accompanied him from Edoras to Gondor during the Ride of the Rohirrim to come to Gondor’s aid against the enemy. In the wake of the epic battle’s conclusion, Gleowine penned a song memorializing Theoden (which the flavor text of his card refers to). An interesting fact is that the name Gleowine means “music friend.”
Out of doubt, out of dark, to the day’s rising he rode singing in the sun, sword unsheathing. Hope he rekindled, and in hope he ended; over death, over dread, over doom lifted out of loss, out of life, unto long glory.
– Gleowine, The Return of the King
Alternate Art (ill. unknown) Alternate Art (by Beorn)
Card Theme
While Gleowine the minstrel was not counted on to fight with the Rohirrim or lead the charge into battle, he would have provided support via his comforting and invigorating songs in the halls of Edoras or in the rear lines of battle, always near Theoden the king. This is reflected in his unimpressive stats yet very helpful ability.
Minstrel
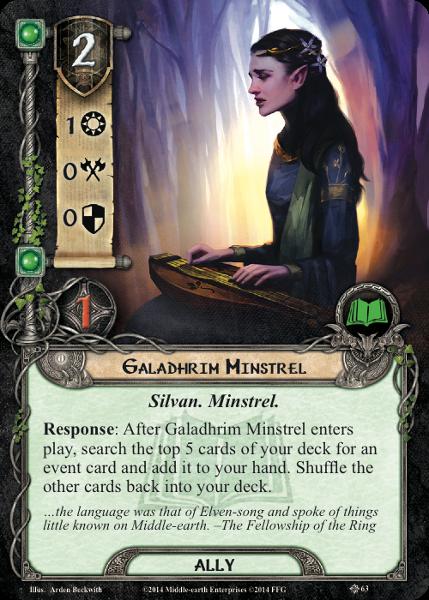
When considering thematic uses for Gleowine, the best place to start is his traits. First, we’ll start with Minstrel. Interestingly, he is one of 2 cards in the game with the Minstrel trait. Any guesses who the other one is??? Rivendell Minstrel is…..somehow not traited Minstrel. That honor goes to the Galadhrim Minstrel. So if you’re hoping to build a deck using the Minstrel archetype, hate to burst your bubble.
Rohan
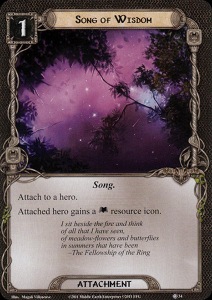
Gleowine’s Rohan trait, however, now there’s a well-developed archetype. So how well does Gleowine fit into a Rohan deck? Not amazing, surprisingly, for a couple of reasons. First, his sphere. As a Lore ally, he obviously will need a hero with the Lore resource icon. There is only one Lore Hero with the Rohan trait: Grima. This is actually not a bad hero to combo off of for Gleowine as long as you are prepared to offset the threat increase from Grima, since the cost of the extra cards Gleowine will draw you can be reduced by 1 once per round. The problem is Grima is better suited for Doomed decks, not Rohan. This leaves you needing to add a Lore resource icon to another Rohan character with cards like Song of Wisdom or A Good Harvest, or else using a non-Rohan Lore hero in your Rohan deck. Not terrible options, but this leads to the second drawback of Gleowine in a Rohan deck.
Rohan decks are built around the mechanic of discarding Rohan characters (i.e. allies) for various benefits such as attack boosts, willpower boosts, readying, etc. If you can get Gleowine into play in a Rohan deck, you can discard Eomund to ready Gleowine and draw a card more than once that round, which is great! If one of your heroes is Theoden, Gleowine only costs 1 when you play him, which again is fantastic and even thematic. The rub comes from the fact that Gleowine is a Rohan ally you want to keep in play as long as possible to get maximum card draw, which goes against the ally discard mechanic of the Rohan archetype. More on this later.
So to answer the question of how well Gleowine fits into a Rohan deck in one word: meh. He will help you draw your essential cards faster and can have his cost reduced to 1 by both Grima and Theoden, and several allies being discarded will allow you to ready him and draw you another card, but you also have to consider how you’re going to get him into play with the dearth of Lore Rohan heroes. And when he is in play drawing you cards, you aren’t going to want to discard him to trigger those beneficial Rohan boosts.
My final comment on theme is that I think the designers should have created a Spirit version of Gleowine later in the card pool as the archetype matured. Perhaps with a Quest Action where you could exhaust him to add +2 WP to a questing Rohan hero (+3 if that hero is Theoden or Eomer) or something like that. This would have been much more fitting thematically for the King’s minstrel.
Card Synergies and Interactions
General Deckbuilding
We’ve looked at Gleowine in a thematic Rohan deck, so now let’s give him a more holistic look when considering putting him in a deck. I’ll show my cards up front (pun intended) and say he is amazing! Card draw is a crucial component of deck building, for if you are top decking your way through a quest then you are likely going to lose. You need a way to get those key cards out as quickly as possible, and Gleowine will provide any deck consistent, repeatable card draw. For the cost of only 2 Lore resources, you get exactly that with this guy. The earlier in the game you can get him on the table, the greater ROI for those 2 resources and the better off you’ll be with more cards in your hand. If you already have card draw elsewhere in your deck such as Daeron’s Runes, Deep Knowledge, Beravor, etc., and you don’t draw Gleowine until the late-game, then he is probably a win-more card at that point.
Next, his stats. 1 WP, 0 attack, 0 defense, and 2 HP adds up to 3, which at face value appears to make Gleowine overcosted by 1 given the standard ally cost of Stat Total divided by 2 = Cost. His ability, though, is where he actually will provide a benefit over time. Think of it this way: if you consider 1 resource to draw one card as a standard cost throughout the game on various cards (Campfire Tales, Hidden Cache, etc.), then Gleowine nets you a benefit after drawing you only 2 cards. You can commit him to the quest in a pinch if you are desperate for more WP, but only do that as a last resort. His ability can often draw you the card you need that same round to quest successfully. For new players this could mean getting Radagast’s Cunning, Secret Paths, Sneak Attack or Gandalf in your hand before the quest phase, which can be more beneficial to you in the Quest phase than Gleowine’s 1 WP. Do not attempt to defend with him unless you are in dire need of a chump blocker, as his 0 defense and 2 HP will almost never survive any enemy attacks in this game.
One other consideration when including Gleowine in your decks is ally readying. This might not be a good first choice since the number of cards that ready allies is slim to none, but one such card is Grim Resolve, which new players will have access to right away in the Core Set. This will ready not just Gleowine to draw you another card, but every character on the table will gain action advantage that round. Other ally readying options include Brand Son of Bain, Narya attached to either Cirdan the Shipwright or Gandalf, The Free Peoples, Leather Boots, Spare Hood and Cloak, and Faramir. Most players find, though, that you don’t get too far beyond the Core set when you start some better card draw options (i.e. Ancient Mathom, Daeron’s Runes, Foe-Hammer, Deep Knowledge) to also include in their decks rather than looking for ways to ready Gleowine.
What I love about Gleowine is that there is literally not a single deck you wouldn’t want him in. His cost is low, Lore is a top notch sphere (rated the community’s favorite sphere in Card Talk’s 2021 Superlative February poll), every single deck will benefit from card draw, and one of the most amazing things about Gleowine is that he is equally as effective in solo and multiplayer!
Messenger of the King Contract
Here’s where things get even more bonkers. Let’s just say there is a reason Gleowine placed 4th out of 83 eligible targets for the contract in Vision of the Palantir’s December 2021 poll on best MotK heroes. Because Gleowine is a unique ally, he is an eligible target for the Messenger of the King contract. For those unfamiliar, this contract allows you to search your deck for a unique ally during Setup who then loses the ally card type and gains the hero card type. To determine that now-hero’s starting threat, you simply add up their total WP, attack, defense, and HP and that is their starting threat. They are now a hero and function in every way as one.
For Gleowine this means a few things. First, he is now a 3 threat Lore hero. That is among the lowest heroes in the game and tied with Smeagol. With so many good Secrecy cards being in the Lore sphere (e.g. Risk Some Light, Noiseless Movement, Out of the Wild, etc), being a 3 threat Lore hero helps with this plus he can help you draw those cards faster.
Second, as a Lore hero he allows you to deckbuild knowing you are going to be most likely drawing an extra card every round, which opens up your options (i.e. you can feel free to include less card draw when building your deck). Finally, he has a variety of readying options now! Unexpected Courage is the most obvious, but you can now include other readying cards such as Cram, Steed of the Mark, Westfold Horsebreaker, Lembas, Miruvor, etc. that can only ready heroes.
The final consideration of Gleowine as a MotK hero is that he is now a 3rd option to consider among card draw heroes, the other 2 being Beravor and Bilbo Baggins who are both also Lore heroes. I’ll briefly compare him with each. Beravor is no doubt a solid hero and is quite versatile with a balanced stat line and her Dunedain and Ranger traits. She can also target a player of your choice like Gleowine can, and provides 2 cards to his 1. However, she is a whopping 7 threat higher than Gleowine, and her ability was errata’d to “limit once per round.” You have no such restrictions with Gleowine. As for our old friend Bilbo Baggins, that 9 threat looks even worse than usual compared to Gleowine’s 3. They both have 1 WP and 2 HP, but because Bilbo has 1 attack and 2 defense where Gleowine has 0 for both, some players like to Voltron Bilbo with attachments. This is not advisable with Gleowine! Both draw you one card each round reliably, where Gleowine’s ability is an action and Bilbo’s is passive. Not a huge deal, but advantage Gleowine here as you can choose which player gets the extra card, whereas Bilbo is restricted to only granting that extra card to the first player and only in the resource phase, which can be a disadvantage in multiplayer. VERDICT: Gleowine is better than Bilbo and can often be better than Beravor, depending mostly on whether or not you want her traits or stats for the quest you’re building for.
Combos and Nonbos
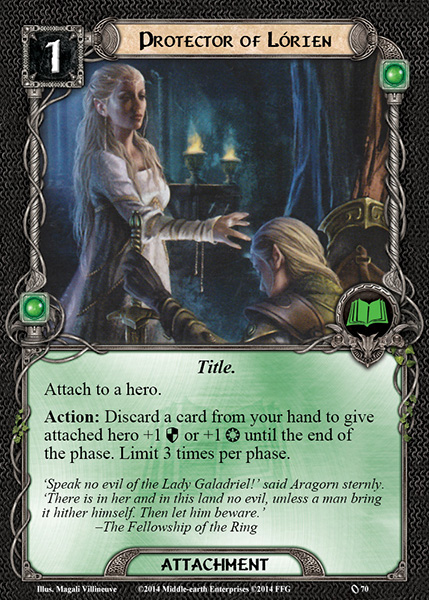
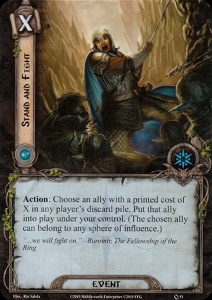
Combos: Some of the best combos with Gleowine can be found in the Core Set/early card pool. He works perfectly with Eowyn by replacing the card you discard to use her ability each round. An even better combo is Eowyn + Stand and Fight + Gleowine where Gleowine draws you extra cards, and you can then select one from the glut of carts that is likely now in your hand to discard for her ability, and finally use Stand and Fight to put it into play using her resources. Another combo is Protector of Lorien + Gleowine for the same reason: he simply gives you consistent card draw to provide a glut of cards in your hand to use Protector of Lorien to great effect. Another card to combo with him is Daeron’s Runes. You have to discard a card from your hand after drawing 2 cards, and having Gleowine to provide that extra card draw gives you plenty of options (hopefully a duplicate unique).
Nonbos: As mentioned above, his ability allows him to still be helpful to a Rohan deck, but he is not helpful to the archetype’s mechanism of discarding Rohan allies to trigger boosts elsewhere because you don’t want to lose his card draw! Eomer, Lothiriel, Eothain, Ride to Ruin, and many others are great cards to include in a Rohan deck, but there are so many other cheap allies you can include to fuel these abilities that won’t negatively impact you like discarding Gleowine would.
Quest Specific
The only quests you definitely want to avoid bringing Gleowine along to are The Fords of Isen as well as The Dunland Trap, both from the Ringmaker Cycle. These quests contain the dreaded Dunland encounter sets that punish you for drawing cards and/or having a lot of cards in your hand.
Other Considerations
Ability Timing – Some encounter deck analysis will help you get an idea of whether or not you can use Gleowine to draw a card anytime you want, or if you need to be more careful on timing. Some classic early cycle examples of nasty cards that can quickly take out Gleowine if you aren’t careful are the Necromancer’s Reach and Dark and Dreadful treacheries. These cards deal 1 damage to each exhausted character, even if they’re exhausted for a different reason than being committed to the quest (Dark and Dreadful will kill Gleowine outright if the location is a Dark location). The key in these examples is to use Gleowine’s ability AFTER the quest phase. If you are playing a quest with encounter cards like these, a helpful suggestion is to use his ability during one of the Combat Phase action windows. This way you get the card draw right before he refreshes for the next round.
Solo or Multiplayer? – I already touched on this above, but Gleowine is amazing in both solo and multiplayer. In solo games he obviously only draws you a card as the only player, but in multiplayer you can decide who you want to draw the card and when. Some turns it could very well be you that you choose to draw a card for yourself, but it is always nice to give your fellow adventurers a hand and spread the card draw wealth when you can.
Ring Rating
Card Talk uses the highly scientific yet arbitrary scale of 1 ring for the card to rule them all to 10 to be cast back into the fiery chasm from whence it came.
The beauty of Gleowine is in the card’s simplicity and versatility (notice I didn’t mention the artwork in there). It’s a simple action: “Exhaust Gleowine to choose a player. That player draws 1 card.” While new(er) players will likely include him in more decks than veteran players will, he is absolutely a card that has stood the test of time. His ability is consistent in that you can use it every single round. It’s repeatable because there are no restrictions on how many times per phase or round you can use it. He’s in a sphere that has many of the best cards in the game. He only costs 2 resources. He can go into literally any deck and be effective. He is as helpful to a solo player as he is in a multiplayer game. The addition of the Messenger of the King contract breathed new life into him and opened up many new and exciting deckbuilding options with him as a hero, to the point the community thinks of him as a top tier target for this contract. To me, the MotK factor boosts him from a good card to a great card. Will you include him in every deck? No. Should he be a consideration for including at least 1x when building a deck though? Absolutely!
The Core Set’s consolation prize for losing a hero.
Background
Brok Ironfist is a FFG created character. He is presumably one of Durin’s Folk or a Longbeard Dwarf. The Longbeards are the only Dwarves introduced in The Hobbit and the Lord of the Rings although there are other clans of Dwarves descended from the original 7 fathers created by Aule.
Card Theme
Brok is not a thematic card aside from being a character created for the game. His ability doesn’t match the damage for a bonus of Gloin and Glimi from the Core Set. Much less the have 5 Dwarves in play mechanic of Thorin’s Company introduced in The Hobbit expansions and mining developed in Against the Shadow and later cycles. I speculate that Brok’s ability is tangential to the damaged Dwarves get a bonus theme since if they get too damaged, you can put Brok into play for free. Especially as it seems from Veteran of Nihuadon that it was a mechanism intended to be developed for the Dwarf trait that later switched to Ents.
Card Synergies and Interactions
Leadership Dain Ironfoot
Brok with Dain in play stats 3/3/1/4 stats that are more in line with his cost. The comparison to the only other 6 cost ally, Beorn, is much closer. Then Brok is only 2 stat points lower than him. I suspect part of the reason Brok costs 6 is because of Dain. The designers have mentioned in interviews that player cards in a cycle are all developed at the same time.
Fellowship Contract
In the same vein as Leadership Dain (mining reference intended), the Fellowship contract can boost Dain’s stats to rival that of many good heroes that have 2 non-hit point stats of 3 like Glorfindel. Dwarves of likely one of the few traits in the game to have enough unique allies to fulfill the contract without including one of the other Middle Earth races. A player could even get 4 willpower and 4 attack with Leadership Dain boosting him as well.
A Very Good Tale
A Very Good Tale can be another way to put Brok into play cheaply besides his own ability. The real value is from exhausting Brok to determine how many resources worth of allies you can put into play. alone he ensures Beorn or Gandalf (Core or Over Hill and Under Hill versions) are eligible. A 2 cost ally exhausted as well then you can usually guarantee just about combination of 2 allies can enter play. Even great value can be extracted if Brok is put into play with Sneak Attack or To Me! O my Kinsfolk!
Flame of Anor
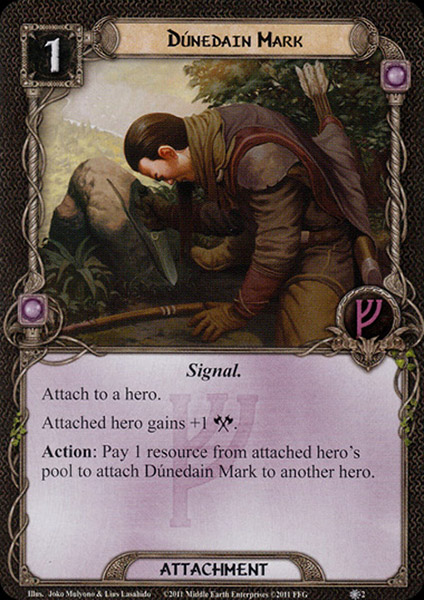
A great use of Brok is actually to not play him, but to discard him. Flame of Anor gives an Istari like Gandalf, Saruman, or Radagast +6 attack. A player could get Saruman in particular to an extremely high attack combining this play with The One Ring with Strength and Courage for +5 attack (15 attack). A War Axe, Golden Belt, and Legacy Blade with 3 completed side quests for an additional +6 (21 attack). Dunedain Marks could bring the final total all the way up to 24 attack. Setting up Brok to be discarded is not difficult with Imladris Stargazer to reorder the top 5 or Wizard Pipe to put him on top.
Messenger of the King
A player could make Brok a hero with Messenger of the King and start with him in play. If Dain is in play, he only has 1 less hit point than Thorin Oakenshield, but costs 3 less threat. Granted, you wouldn’t get a useful ability which would be the big downside. Especially considering the large number of other Dwarf hero options with very useful abilities like Balin.
Quest Specific
The first two cycles and The Hobbit Saga expansions included many encounter cards that were outright Hero killers. In the Core Set, players had to watch out for taking too much direct damage from Necromancer’s Reach and Evil Storm. Not to mention Hummerhorns dealing 5 damage to a hero when engaged or 1 damage to each character when revealed as a shadow. There are also a few shadow effects that become worse on an undefended attack that is often necessary in the early game.
The Darrowdelf cycle even more notoriously included effects that can outright discard a hero if the player(s). Not just as the when revealed effect but also in the shadow effect! A free ally with hero level stats won’t completely offset the loss, but it is still something that might let a player limp to the end of the quest.
Ring Rating
Card Talk uses the highly scientific yet arbitrary scale of 1 ring for the card to rule them all to 10 to be cast back into the fiery chasm from whence it came.
I rate Brok at 8 rings. He’s undoubtedly expensive for the stats you get unless Leadership Dain is in play. Partly it is due to core set where the cost curve was slightly higher. Later expansions lowered overall cost curve with many efficent 2 cost allies. Also he’s in Leadership and Leadership cards tend to be a little more expensive. It is the sphere with the best and most resource acceleration and as a result Leadership cards tend to be a little more expensive. Another consider I’m sure was that he was developed with Dain.
Still, he has hero level stats as many of them have a couple 2’s in willpower, attack, or defense. Only Dain, Thorin Oakenshield, and Thorin Stonehelm having a 3 stat that isn’t hit points. His ability isn’t one that you want to plan for. Especially since The Houses of Healing and Fortune or Fate both cost 5 and don’t provide much of discount to play him. It can still be a nice consolation prize if you lose a hero particularly in the late game when resources may not be needed as much. The stats to make the last questing push can be key to securing victory.
I think that Brok is consigned to being considered one of the worst cards in the game by the community for a few big reasons. First that he came out in the Core Set without Dain. This was compounded by that Dain came out in the last pack of the cycle with a huge gap of time between the Core Set and the first AP. Players had a long time to form an opinion without a major boost card. Second, the only other 6 cost card in the game is ally Beorn that comes with two major stats at 3 and more printed hit points than any player except his hero version. On top of all that, Beorn has an amazing ability that is a huge help against the biggest enemies in the core set. Lastly, the cost curve ended becoming lower with more good 2 cost allies and no more 6 cost cards.
Is Brok the worst card in the game? I don’t think so. Discarding him to Flame of Anor is a least one really good way to use him. Playing him as an ally with Dain on the table is not bad, but it is a big investment. Particularly when Dwarves are extremely well developed trait with many different ally options.
Ally (16)
1x Azain Silverbeard (Flight of the Stormcaller)
1x Bofur (Over Hill and Under Hill)
1x Bombur (Road to Rivendell)
1x Brok Ironfist (Core Set)
2x Dori (Over Hill and Under Hill)
1x Dwalin (On the Doorstep)
2x Fili (Over Hill and Under Hill)
1x Gimli (The Treason of Saruman)
2x Glóin (On the Doorstep)
2x Ioreth (A Storm on Cobas Haven)
2x Kili (Over Hill and Under Hill)
A Three Elven Rings deck full of powerful unique allies that Vilya can put into play. Narya can ready and boost them. Extra copies can fuel a big attack from Gandal with Flame of Anor.
Main Deck
Hero (3) Elrond (Shadow and Flame)
Galadriel (Celebrimbor’s Secret)
Gandalf (The Road Darkens)
Firyal was created as means of fleshing out the Harad characters. In the book/movie they are the bad guys, but there is a line from Sam where he wonders if the Harad man that he just saw slain was really a bad guy or if he would have rather stayed home. We get a string of Harad heroes for the game and I love that.
Card Theme
Firyal is meant to be an efficient scout and quester, which her ability emphasizes.
Card Talk uses the highly scientific yet arbitrary scale of 1 ring for the card to rule them all to 10 to be cast back into the fiery chasm from whence it came.
Firyal is the best lore hero in the game. As a primarily solo player I find her ability to filter the top of the deck to be incredibly useful. In solo play you have to do everything on your own. You have to be able to quest, defend and attack on any given turn. Firyal allows you to get rid of something that you can’t handle that turn. If you have an enemy still engaged with you from the previous round, you might use Firyal’s ability to get rid of an enemy from the top of the deck in hopes of seeing a location. She can also help you get rid of those impossibly difficult treacheries if you don’t have a test of will in hand or want to save it. Finally, because she is a unique ally, she is a great target for the contract, Messenger of the King. Having her amazing ability and 3 will power from turn one is a great deal for 9 threat.
An ally with an ability built for the Traps archetype that is a little too expensive in resource and opportunity cost.
Background
‘Now I have him at the arrow-point,’ said Anborn. ‘Shall I not shoot, Captain? For coming unbidden to this place death is our law.’
The Two Towers, Book 4, Chapter 6: The Forbidden Pool
Anborn is one of the Ithilien Rangers under the command of Faramir. He is the one to spot Gollum lurking around the Forbidden Pool. As the quoted above, he keeps an arrow trained on Gollum ready to shoot while Faramir questions Frodo about Gollum.
Card Theme
Anborn’s ability puts him into the Gondor Rangers trap archetype developed during Against the Shadow. This is very thematic to the Rangers of Ithilien. They’re a guerrilla force to harass the enemy at every opportunity, but they’re vastly outnumbered. Traps and ambushes to quickly take out the enemy and then fade away back into their secret hiding places to avoid any sort of counterattack. Anbornhas a strong attack stat to help kill enemies in one attack. If not needed on the attack, he can get a trap back to help set up their next offensive.
Card Synergies and Interactions
Traps
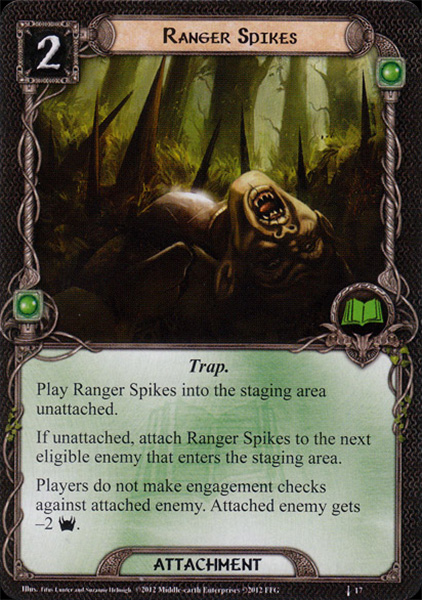
Of course with his ability you can get more uses out of Ithilien Pit, Poisoned Stakes, and Ambush. These often will end up in the discard as they facilitate killing the attached enemy. Entangling Nets can also be a good one to get back if used to lower an enemy’s defense.
Ranger Spikes and Forest Snare often won’t need to be retrieved since they can effectively remove an enemy from the game. There are some cases where you will need to kill the trapped enemy anyway. For example, putting a Forest Snare on the Hill Troll in Journey Along the Anduin is a great way to deal with it. You only have to defend it once before throwing the trap on. (Son of Arnor can get it engaged during planning to avoid even the one defense, but it’s harder to pull off.) Then you can kill it over the course of a few turns without too much trouble.
Followed is another where hopefully you don’t need to bring it back with Anborn. He does allow you to put out there and if it attaches to a low threat enemy, just kill it, get Followed back, and replay it.
Readying
The biggest drawback to Anborn’s ability is that you need to exhaust him. This prevents you from using his 3 attack that turn. There may be times when you don’t need his 3 attack because no enemies revealed or another player has combat covered. Still being able to attack and use his ability is better.
There are a fair number of options for readying Anborn. Leather Boots is cheap, in-sphere and can be made more reliable with cards like The Hidden Way and Dunedain Pathfinder. Leadership Faramir hero is a very thematic choice. Anborn’ and Leadership Faramir hero combos well with the Ambush trap since you get to attack when the enemy is engaged. You will just want to plan ahead and use his ability during the Travel phase action window.
Narya can be another great card for readying Anborn. Not only does he ready but he gets a boost to his best stat, attack. His defense is also boosted to 2. This with his 3 hit points makes him into a decent defender for a 2 or 3 attack enemy.
Spare Hood and Cloak is a little trickier to make into a reliable source of readying. Fortunately, Long Lake Trader that can move it to an a weaker ally or an ally that doesn’t need to exhaust like North Realm Lookout is also in Lore.
There are some ally readying events like the core set Ever Vigilant. To Arms! can be especially useful if already running Leather Boots and/or Spare Hood and Cloak. Swift and Strong is a bit more conditional and is better if you have a second target to attack. This is because it will buff his attack to 5! This can really help clear the board of enemies especially if Anborn has a Ranger Spear.
Grim Resolve, Strength of Arms, and The Free Peoples offer global readying. Most likely you won’t be playing these to get Anborn to attack and use his ability. Still he can contribute his 1 willpower if needed to quest and then readying with everyone else for combat. Alternatively, if it’s a heavy combat quest, getting to attack twice for 3 is always good.
Messenger of the King
The contract can make Anborn into an 8 threat cost hero. He already has stats on par with core set Legolas. His trap recursion ability can help set up a draw engine with Damrod hero. Especially if using the traps mentioned earlier that will end up the discard pile frequently. He’s a decent choice for a thematic Rangers of Ithilien build. Thematic considerations aside, Legolas ally outshines him for the contract. Same threat cost and an ability that provides card draw just for killing enemies is much more efficient.
Once he is a hero, there are many more options to ready him. In sphere there is Wingfoot and Lembas. Out of sphere, there is the core set staple Unexpected Courage, Steed of the North, Leadership Gimli hero, Cram, and Magic Ring. Wingfoot and Steed of the North like Leadership Faramir hero mentioned earlier take some planning to use his ability before readying given they are triggered effects.
Ranger Spear
Anborn is one of the best Ranger allies to attach this to. Yazan and Vigilant Dunadan are the only other Ranger allies with a base attack of 3. Most of the Ranger heroes only have attack of 2 for that matter. His ability will help make the +2 attack bonus more reliable.
Quest Specific
His 3 attack can be helpful in quests that have battle questing like those in Heirs of Numenor and the first part of Battle of Carn Dûm. If you give him Ranger Spears, any quests where enemies are guarding cards like Escape from Dol Guldur or the Hobgoblin enemy in the Ered Mithren cycle, he can attack for 5-7 even without traps in play.
Ring Rating
Card Talk uses the highly scientific yet arbitrary scale of 1 ring for the card to rule them all to 10 to be cast back into the fiery chasm from whence it came.
I rate Anborn at 7 rings. I admit this has a lot to do with my disappointment with trying to fit him into a Trap deck. He’s too expensive to be more than a mid to late game card. That’s likely when you’ll need to get back some traps. Unfortunately usually at that point you should be set up to not need them anymore. This because the best ones to recur, Ithilien Pit, Poisoned Stakes, and Ambush are better early when threat is low and can control engagement better. Erebor Hammersmith then at 2 cost is better to get one of those back early. The trap archetype also is now very full with the addition of Tactics traps and Emyn Arnen Ranger. Anborn tends to be a one of if he makes the cut at all.
I think really what he offers is the 3 attack stat. He’s basically the Lore version of Legolas Ally with a worse ability. The only other ally in Lore with 3 attack is Quickbeam. If not building Mono-Lore, he has some stiff competition from other 4 cost allies like Treebeard and Northern Tracker.
I haven’t played with him as a Messenger of the King hero, but I just don’t see his 8 threat is really low enough to help with keeping a trap deck’s threat low to avoid engagement. I think you’re better off just using the other low threat Lore heroes to get into Secrecy or the likes of Gleowine to get threat as low as possible. Also for the threat cost, there just some better options like Tactics Legolas ally with a more universally useful ability.
Forlong is introduced in The Return of the King as the Lord of Lossarnach with two rather unflattering nicknames.
‘Forlong! Forlong!’ Pippin heard men calling. ‘What do they say?’ he asked. ‘Forlong has come,’ Bergil answered; ‘old Forlong the Fat, the Lord of Lossarnach. That is where my grandsire lives. Hurrah! Here he is. Good old Forlong!’ Leading the line there came walking a big thick-limbed horse, and on it sat a man of wide shoulders and huge girth, but old and grey-bearded, yet mail-clad and black-helmed and bearing a long heavy spear. Behind him marched proudly a dusty line of men, well-armed and bearing great battle-axes; grim-faced they were, and shorter and somewhat swarthier than any men that Pippin had yet seen in Gondor. ‘Forlong!’ men shouted. ‘True heart, true friend! Forlong!’ But when the men of Lossarnach had passed they muttered: ‘So few! Two hundreds, what are they? We hoped for ten times the number. That will be the new tidings of the black fleet. They are sparing only a tithe of their strength. Still every little is a gain.’
The Return of the King, Book 5, Chapter 1: Minas Tirith
Forlong fought in the Battle of Pelennor Fields. It is revealed in the Mounds of Mundberg song that he fell in battle alongside many other lords of Rohan and Gondor. Lossarnach is located southwest of Minas Tirith comprised of the White Mountain’s flowered vales.
Card Theme
There is not much about Forlong in the books to draw on the source of his readying ability. I argue it is intended to represent his dependability and reliability based on the people calling him a true heart and friend. The Outlands theme in general, however, is a different story.
Gondor arguably was the only empire of Middle Earth in the Third Age. It encompassed several different regions and had built up from Númenórean Faithful colonies and intermingled with other peoples over the course of its history. The southern fiefs called the Outlands provided different resources to the rest of Gondor. Most notably for the stat boosting mechanism to other Outlands characters is the captains of these lands brought 2,000 soldiers all equipped and trained differently. The strength of Gondor through its various peoples and lands is what is represented in the Outlands allies making each other stronger. Forlong is still and extension of that general theme.
Card Synergies and Interactions
Outlands
Forlong like all the other Outlands allies gets better the more you play. Play all the other stat boosting allies like Warrior of Lossarnach, Anfalas Herdsman, Ethir Swordsman, and Knights of the Swan. Then Forlong will have hero level stats and ready each phase. Hirluin the Fair with the resource smoothing for Outlands allies helps get them all into play.
Messenger of the King
The contract can put him into play right at the start with a pretty low starting threat of 6. Nearly the same starting threat as Spirit Glorfindel. While his stats aren’t as impressive to start, it only takes a couple Outlands allies and he provides some extra value for his initial threat cost. Additionally, he’ll have the printed Leadership icon for Lord of Morthond and Strength of Arms. This makes Messenger of the King Forlong a strong hero option in an Outlands focused deck.
Spare Hood and Cloak and Marnier’s Compass
Forlong won’t really get much for readying during the Travel and Encounter phases. That is unless you find a way to exhaust him for a benefit. Enter Spare Hood and Cloak and Marnier’s Compass. Now when he readies during those phases you can exhaust him and the cloak to move it and ready the character you moved it to. Play a Long Lake Trader or two and you can repeat this every turn. Mariner’s Compass is another ally attachment that allows you to replace a location in the staging area. It is a very solid location control card, or even better use it to free a Guarded card from a location.
Quest Specific
Forlong’s readying ability makes him great in quests that have many “exhaust a character” effects. You will often see them as a travel cost or forced effect on an enemy engagement. Even more often it will be a treachery or shadow effect.
If using Forlong as a Messenger of the King hero, the number of quests his readying is helpful increases substantially. Basically any quest with objectives that require a hero to be exhausted to claim them, such as, A Journey to Rhosgobel, The Seventh Level, and The Steward’s Fear. He can also counter some of the terrible condition attachments like Caught in a Web and Watchful Eyes.
Ring Rating
Card Talk uses the highly scientific yet arbitrary scale of 1 ring for the card to rule them all to 10 to be cast back into the fiery chasm from whence it came.
I rate Forlong at 5 rings. He is incredibly good in an Outlands deck with all the other Outlands allies. Outside of an Outlands deck he’s an expensive ally with low stats. The 5 rings I think best represents this very limited awesomeness.
Dave’s Version of Grant’s Grey Wanderer Hirulan Deck
The low starting threat of having a single hero helps give the Outlands deck time to build up for combat. Plus the acceleration provided by Resourceful and Timely Aid is very helpful too.